Integration with React Native
- 26 Nov 2023
- Print
- DarkLight
Integration with React Native
- Updated on 26 Nov 2023
- Print
- DarkLight
Article Summary
Share feedback
Thanks for sharing your feedback!
v1.x
Supported iOS Versions
iOS version 8 and higher
Introduction
The iOS SDK works by constantly profiling and evaluating device behavior to ensure that the connections to your mobile APIs and services are genuine.
This process is complex and detailed yet only requires initializing a context to manage a set of secure HTTP headers which are added to all HTTP and HTTPS requests made by the mobile application to the origin server. These HTTP headers are refreshed on a regular basis by the PX Manager (context) as it is profiling the end-user’s mobile device.
Prerequisites
The following are required to install the iOS SDK:
Administrative access to the HUMAN Portal to:
- Retrieve the application ID.
- Set the token expiration and validity.
An active Enforcer.
A sandbox or staging environment for development and testing (recommended).
React Native dependencies
Integration
Adding the iOS SDK to your project
- Add the iOS SDK Binary to Your Project with:
https://github.com/PerimeterX/px-iOS-Framework (the official repository for hosting the iOS SDK).
The repository can be integrated with CocoaPods or Carthage.
CocoaPods
Add pod 'PerimeterX' to your
Podfile < >__.
    source 'https://github.com/CocoaPods/Specs.git'
    platform :ios, '10.0'
    use_frameworks!

    target '<Your App Name>' do
        pod 'PerimeterX'
    end
You can now run pod update and once completed don’t forget to close and reopen your Xcode workspace.
Carthage
Add the following to the app's Cartfile:
binary "https://raw.githubusercontent.com/PerimeterX/px-iOS-Framework/master/PerimeterX.json"
Then run
carthage update --platform iOS
- Once the binary is added to your project, resync the build files to ensure the package is downloaded.
- The SDK is now installed, and there should not be any build errors when compiling your application.
Adding the PX Manager Object
- In your AppDelegate.m file import the PerimeterX library.
#import <PerimeterX/PerimeterX.h> - In your AppDelegate.m file, add the following mandatory methods using the example below.
    -(void) newHeaders:(NSDictionary *)httpHeaders {
        NSLog(@"PXManagerDelegate: newHeaders: %@", httpHeaders);
    }

    -(void) managerReady:(NSDictionary *)httpHeaders {
        NSLog(@"PXManagerDelegate: managerReady: %@", httpHeaders);
    }
- When adding the PXManagerDelegate extension the following two functions are required: managerReady and newHeaders.
- The managerReady is called when the first set of HTTP headers are available.
- Setting the newHeaders is required to ensure that the PXManagerDelegate will notify the application that a refresh to the HTTP headers occurred. This is based on the token validity time set in the HUMAN portal.
- Action in the newHeaders method is optional. (reference the code example above).
Initializing the PX Manager
In AppDelegate.m you must now initialize the PXManager object inside the didFinishLaunchingWithOptions handler:
   - (BOOL)application:(UIApplication *)application didFinishLaunchingWithOptions:(NSDictionary *)launchOptions {
        // Override point for customization after application launch.
        PXManager *pxManager = [PXManager sharedInstance];
        pxManager.delegate = self;
        [pxManager startWith: @"PX123456"]; // Defines your Application ID

        return YES;
    }
Creating a Bridge For The Native Methods
- In your project, create a new file called
PXBridge.hwith the following content:#import <Foundation/Foundation.h> #import <React/RCTBridgeModule.h> NS_ASSUME_NONNULL_BEGIN @interface PXBridge : NSObject<RCTBridgeModule> @end NS_ASSUME_NONNULL_END - Create the implementation of
PXBridgeby creating a file calledPXBridge.mwith the following content:#import "PXBridge.h" #import "React/RCTLog.h" #import <PerimeterX/PerimeterX.h> @implementation PXBridge RCT_EXPORT_MODULE(); RCT_REMAP_METHOD(getHttpHeaders, getHttpHeaders_resolver:(RCTPromiseResolveBlock)resolve getHttpHeaders_rejecter:(RCTPromiseRejectBlock)reject) { PXManager *pxManager = [PXManager sharedInstance]; NSDictionary *httpHeaders = [pxManager httpHeaders]; resolve(httpHeaders); } RCT_EXPORT_METHOD(verifyResponse:(NSDictionary *)response verifyResponse_resolver:(RCTPromiseResolveBlock)resolve verifyResponse_rejecter:(RCTPromiseRejectBlock)reject) { PXManager *pxManager = [PXManager sharedInstance]; PXBlockResponse *blockResponse = [pxManager checkError:response]; if (blockResponse.type == Block || blockResponse.type == Captcha) { dispatch_async(dispatch_get_main_queue(), ^{ UIViewController *rootViewController = [UIApplication sharedApplication].delegate.window.rootViewController; [[PXManager sharedInstance] handleBlockResponse:blockResponse with:rootViewController captchaSuccess:^{ NSLog(@"captcha success"); resolve(@"success"); } captchaClose:^ { NSLog(@"captcha closed"); NSError *error = [NSError errorWithDomain:@"perimeterx.sdk" code:11 userInfo:NULL]; reject(@"captcha closed", @"challenge page closed",error); }]; }); } else { NSLog(@"Not a PerimeterX Response"); resolve(@"NotPXBlock"); } } @end
The bridge exposes the minimal methods required for the SDK to operate:
getHttpHeaders- returns a JSON file containing the HTTP headers.verifyResponse- verifies the 403 response and based on its content - either returns the response unchanged or calls the SDK'shandleBlockResponsemethod.
Adding the HTTP Headers to the HTTP Requests
Once the PX Manager is initialized, you need to add the HTTP Headers to every network request your app is making. These headers can be retrieved by calling the [pxManager httpHeaders] method of the SDK, which is exposed to the JavaScript side by the bridge created in the earlier step.
Using Axios
To add the HTTP headers to every request using Axios, use the following example:
    import {NativeModules} from 'react-native';

    axios.interceptors.request.use(async (config) => {
        const pxHeaderResponse = await NativeModules.PXBridge.getHttpHeaders();
        for (var prop in pxHeaderResponse) {
            config.headers[prop] = pxHeaderResponse[prop];
        }
        return config;
    }, function (error) {
        throw error;
    });
Using Fetch
To add the HTTP headers to a fetch request, either add the headers directly to each fetch request, or create a wrapper like the following example:
    async function callFetch() {
        const url = '                                      ';
        const pxHeaderResponse = await NativeModules.PXBridge.getHttpHeaders();
        let headers = {};
        for (var prop in pxHeaderResponse) {
            headers[prop] = pxHeaderResponse[prop];
        }
        let result;
        try {
            result = await fetch(url,{
                method: 'GET',
                headers: headers
            })
            let jsonResult = await result.json();
            return jsonResult;
        } catch (e) {
            throw e;
        }
    }
Managing Requests Denied
When a HTTP request is denied by the solution a 403 response code is sent in the HTTP response along with a JSON body encoded as a UTF-8 that is parsed and used by the iOS SDK. The parsed JSON is then used to render a WebView to either challenge (with CAPTCHA) the visitor, or block the visitor from continuing in the application. If the user solves the presented challenge they will return to the application. If the user fails the CAPTCHA challenge they continue to be challenged until they pass the verification screen.
Implementing the Error Handler
The PXManager object checks the body of the returned error message by calling [[PXManager sharedInstance] checkError:body] and if the 403 error originates from PX, the [[PXManager sharedInstance] handleBlockResponse:blockResponse] method. A combination of these methods is exposed to the JavaScript side from the native bridge.
The easiest way to implement the error handler in React Native is through the use of Axios's response interceptor.
Using Axios
    axios.interceptors.response.use((response) => {
        return response;
    }, async (error) => {
        if (error.response.status === 403) {
            let result = await NativeModules.PXBridge.verifyResponse(error.response.data);
            if (result == "NotPXBlock") {
                throw error;
            }
        } else {
            throw error;
        }
    });
Using Fetch
    async function callFetch() {
        const url = '                                      ';
        const pxHeaderResponse = await NativeModules.PXBridge.getHttpHeaders();
        let headers = {};
        for (var prop in pxHeaderResponse) {
            headers[prop] = pxHeaderResponse[prop];
        }
        let result;
        try {
            result = await fetch(url,{
                method: 'GET',
                headers: headers
            })
            let jsonResult = await result.json();
            return jsonResult;
        } catch (error) {
            if (error.response.status === 403) {
                let result = await NativeModules.PXBridge.verifyResponse(error.response.data);
                if (result == "NotPXBlock") {
                    throw error;
                }
            } else {
                throw error;
            }
        }
    }
Adding Custom Parameters
Added in version: v1.4.1
Custom parameters allow you to collect and send specific information, be it device or app related, that may be used later for aggregations and intelligence. Using PXManager's setCustomParametersDictionary() method you can specify up to 10 custom parameters to be sent to servers on every network request.
setCustomParametersDictionary() accepts a NSDictionary of type [String:String] with all the keys beginning with custom_param followed by a number (1-10).
It is also important to note that the setCustomParametersDictionary() method is set once inside the didFinishLaunchingWithOptions handler, before calling the start method.
The following example adds 2 custom parameters:
    - (BOOL)application:(UIApplication *)application didFinishLaunchingWithOptions:(NSDictionary *)launchOptions {
        // Override point for customization after application launch.
        PXManager *pxManager = [PXManager sharedInstance];
        pxManager.delegate = self;
        [pxManager setCustomParametersDictionary:[NSDictionary dictionaryWithObjectsAndKeys:@"John Bradley",@"custom_param1", @"New York", @"custom_param2", nil]];
        [pxManager startWith: @"PX123456"]; // Defines your Application ID

        return YES;
    }
WebView Integration
Added in version: v1.15.1
If your application includes a WKWebView, you need to allow the SDK to handle the session connection between the web view and the application.
This is done automatically by starting the SDK with the PXManager.startWith method.
If your web view needs to handle deprecated TLS connections, make sure to implement webView:authenticationChallenge:shouldAllowDeprecatedTLS delegate method. The current implementation does not allow deprecated TLS versions.
Support Account Defender (From version 1.16.3)
To enable this feature a user ID must be set. That can be done by calling the PXAccountDefenderManager.setUserId function and providing the user ID. When the user ID is changed, the function should be called again with the updated user ID. If the user logged out, the function should be called with nil. This function should be called after the PXManager.startWith function.
To register outgoing URL requests, call the PXAccountDefenderManager.registerOutgoingUrlRequest function with the URL. This function should be called only when Account Defender is enabled (user ID is set).
User Agent Convention
The application's user agent is used to identify and differentiate between application versions. For accurate detection it is important that the user agent your application reports is informative. Here is the recommended convention:
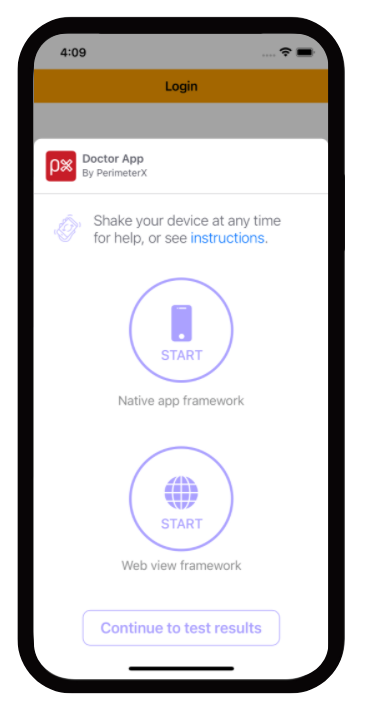
Doctor App
The "Doctor App" is a tool to help you verify the mobile SDK integration by simulating a typical user flow in your application. To enable this feature, add the enableDoctorCheck = true parameter in the start method.
IMPORTANT NOTICE
This feature is for development purposes only and should not be shipped with your application to the application store.
Example:
[PXManager.sharedInstance startWith:@"[YOUR_APP_ID]" enableDoctorCheck:YES];
Flow:
- Welcome screen: In this screen you select whether to start a new test or load the summary of the previous test, if one exists.
- Instructions screen: In this screen you get detailed instructions on how the Doctor app works
- Test selection screen: In this screen you choose which type of test to execute. Options are:
a. Native app framework - test your native URL requests.
b. Web view framework - test your web view's URL requests.
After executing either test, you will return to this screen to be able to execute the other test or to continue and review the test results in the summary screen.
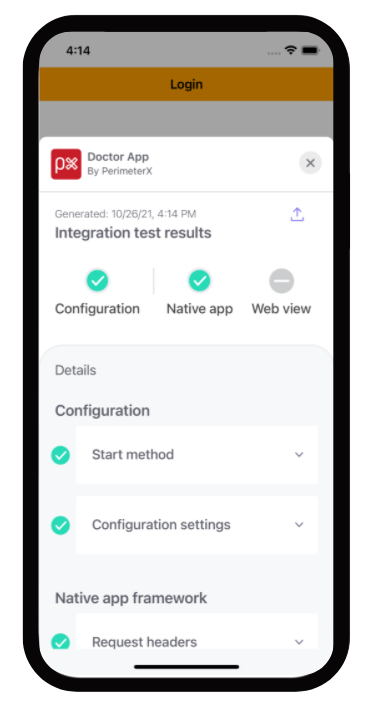
- Summary screen: In this screen you are able to view the results of the executed tests. You can go into details regarding each test and get troubleshooting tips in case a test failed to help you analyze what is causing this issue.


Important Notice
When you exit the doctor app, your application will also terminate. Just remember to switch the 'enableDoctorCheck' parameter to false when you finish validating your integration with the mobile SDK.
Verifying Your Integration
Validating that PXManager is Loaded Properly
Checking the ManagerReady Callback
To verify that SDK is implemented correctly, print a line to the console when the ManagerReady callback is fired.
    -(void) managerReady:(NSDictionary *)httpHeaders {
        NSLog(@"PXManagerDelegate: managerReady: %@", httpHeaders);
    }
A log line similar to the example below should be displayed.
    2017-10-10 15:13:22.536 PX Obj C[64870:23419637] PXManagerDelegate: managerReady: {
        "X-PX-AUTHORIZATION" = "3:497f904bae55a3cca2800da80892a72ba25e5e4beef6798722f0e7743a760b67:pZ98scNgg8mc7LOY74h1uHV1/mybppJORCzop3OSiIbQXnfQI3p12kFMrO+4HuOHt1KD+3oUW8rO+Cvj1kBjag==:1000:7Tonf5zinmI8mX7Y7LynB4pWi56rtqbCp8krXnaeq1TsN07XXeMM9OgnVUmmAq2kEhd0DPDkh+CAVZ+OS0L24cMtlTbJNo0mpbqj9YvAhXwoV2jUT1er9XS+AO1Kq0IERgyaufKQGjwIjXzXVP7zdcG3JuB4m9LyHT1WiWTdLRw=";
    }
Validating that HTTP Headers Are Part of Your Request
Connections to your API endpoint can be inspected using a local proxy such as CharlesProxy_.
When inspecting requests look for the HTTP header named X-PX-AUTHORIZATION.
Please note requests to the perimeterx.net domain are also pinned to a specific SSL certificate and cannot be inspected with Charles Proxy. If you have enabled SSL proxy for all domains you must exclude perimeterx.net.
If this header is not present go back to the application code responsible for making the request and review to verify the headers were added to the request properly.
Validating Denied Requests
Denied requests will have one of two possible actions, block or challenge, and both should be validated to ensure the request is properly handled.
Console Developer Testing Tools
Developers integrating with the Mobile SDK can be given access to the HUMAN Portal in a developer role. They then have access to the Developer section, which contains the Mobile Enforcement Verification tool. This tool allows a developer the ability to mark their requests to be denied for testing purposes.
The testing tool is necessary to validate denied requests.
Note
Make sure the enforcer you are testing against is set to blocking mode before proceeding with the instructions.
- Access the tool at https://console.humansecurity.com/botDefender/developer
- Locate your test device's Visitor ID (<glossary:VID>), and click the <glossary:VID> Extractor button.
This will launch the <glossary:VID>Extractor model:
- Insert your IP address and click Search. This locates all <glossary:VID>s for your APP ID.
- Click Select to return to the tool with the App ID and <glossary:VID> fields populated.
- When the App ID and <glossary:VID> are available, you can start validating denied requests.
Validating a Challenge Response
To validate a challenge response:
- Click CAPTCHA in the test tool and wait for the green toast notification to confirm you are ready to continue.
- When the next PX token refresh occurs in your mobile application you will receive the CAPTCHA WebView.
- To force a token refresh simply exit and relaunch the application.
- Solve the challenge presented and verify that you are able to return to the application and continue using it.
Validating a Blocking Response
To validate a blocking response:
- Click Block in the test tool and wait for the green toast notification to confirm you are ready to continue.
- When the next PX token refresh occurs in your mobile application you will receive the block WebView.
- To force a token refresh simply relaunch the application. Once you are blocked you cannot continue.
- To release from blocking, exit the application, click the Clear button, and reload the application to verify that the clean token was received and the application is operating as expected.
Appendix
Configuring an iOS Emulator to use Charles Proxy
To configure your iOS Emulator set the HTTP proxy settings on your computer. The emulator will use your computer’s local network connection.
In order to intercept HTTPS requests follow the guidelines at https://www.charlesproxy.com/documentation/using-charles/ssl-certificates/.
Deactivating the PX Mobile Sensor Remotely
In certain cases, the PX Mobile Sensor (SDK) may need to be deactivated remotely, and the app run without any sensor intervention.
This can be done based on any combination of the following parameters:
- AppID
- Operating System
- Operating System Version
- SDK Version
- App Version
To deactivate the PX Mobile Sensor, contact socsupport@humansecurity.com or your assigned focal point. Portal support to allow deactivation via the Portal will be added in the future
Was this article helpful?